OnTheGoSoft
OnTheGoSoft Blog
Tips, news and ideas for using our programs

Archive for the ‘Ideas’ Category

We’re Finally on Facebook

Wednesday, October 13th, 2010

After 7 years of operation, OnTheGoSoft finally has a Facebook page.

We have a blog, comments, a contact form and direct email. So why another channel? Simply, because people have asked for it.

Now, when you’re printing your own passport photos and saving money, there’s an easy way to share the love.

Head over to our Facebook page and Like it. Simple, right? Try it for yourself!

Background for Passport Photos

Monday, October 4th, 2010

One of the most frequent question that folks as us is how to change the background of passport photos.

About Me

First, I’d like to say that I’m not a professional photographer. All I have is a simple Sony Cybershot digital camera and a $70 Canon printer.

However, since I travel quite a lot with my wife and 3 kids, we need to make new passport photos regularly.

The tips you find here are what I do, to get good passport photos. I’m pretty sure that you can do better with professional photo equipment.

Amir

While the unfortunate answer is that digital edits are strictly prohibited, there are simple things that you can do to achieve the right background for your photos.

Use Natural Ambient Lighting

Natural lighting (a.k.a sunlight) will give you good color balance and will help keep a uniform background. It may not be enough, but it’s a great start.

Try to take the passport photos so that the window with the sunlight is behind the camera, facing the subject. This way, the background will remain smooth and without shadows.

Of course, you don’t want to have blinding sunlight on the face of the subject. Use shades to keep the light ambient.

Add a Flash

Even if natural lighting conditions are good, you should also add a flash. Using a flash will help iron out shadows and will cancel sideways-coming light sources.

Make sure that using the flash doesn’t light only the object and darken the background.

Keep Distance Between the Subject and Background

If the subject of the photo is standing very close to the background, you will most likely see some sort of shadow on the wall.

Since the flash and the camera lens are not at the exact same place, some shadow will always exist. To reduce this shadow and make it virtually invisible, the object of the photo should stand about 1/2 to 1 meter (2-3 feet) from the background.

This way, the passport photo will not show the shadow that the object is dropping on the wall. This shadow will mix with the ambient light and will practically disappear.

Shrink Pic localization - behind the scenes

Tuesday, May 5th, 2009

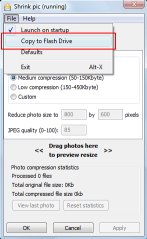
Shrink Pic is a program that automatically resizes photos sent by email or uploaded to the web. it catches file read operations in other programs and replaces large photos with smaller versions. It’s is a C++ program, written using the excellent wxWidgets library.

We’ve recently localized it to Spanish, French, German and Japanese. This article tells the story of how Shrink Pic went multilingual.

1) Placing all strings in a resource file

A resource file is a fancy name for a file which holds some data for the program. In our case, the resource file contains all the texts that appear in Shrink Pic. Before this was done, texts appeared within the code. For example, the program’s title was set with this line of text:

SetTitle(_T("Shrink pic (running)"));

When text is found inside the program’s code, it’s difficult to translate a program. The reason is, changes must be made in many places making the localized program much different than the original one.

The seperate between the code and texts, we used the gettext framework. This makes localization as easy as it can be. Here’s the change in the line that sets the program’s title:

SetTitle(_("Shrink pic (running)"));

Did you notice the difference?

The first call uses _T(text) and the second call uses _(text). The _T() function places a Unicode string in the program. The _() function places a text which goes through gettext.

What gettext does is check if a certain string has translation to another language. If it does, it returns the translation. Otherwise, it returns the original string. So, for example, when Shrink Pic is running in Spanish and we call it with “Shrink pic (running)“, it will return “Shrink pic (activo)“.

From that point on, it’s a smooth ride. All the translation is done outside of the program. We’ll get to it in a minute.

2) Collecting the strings that need translation

So now, our program’s texts all pass through gettext, which provides their translation during run-time (when Shrink Pic executes). The next step is to provide the translations.

Gettext uses files called .po (portable object) and .mo (machine object). The .po files are actually text files that contain strings and their translation. The .mo files contain the same data but are formatted so that programs can read them faster (without parsing).

The process for providing the translation is:

  1. Create a .po (or .pot - portable object template) file with all the program’s strings.
  2. Translate all strings in that file to each language, keeping each language translation in a different .po file.
  3. Convert from .po to .mo (a program does that for us).
  4. Load the .mo files to our program (Shrink Pic) so that it can use the translations when it runs.

Much of the work required for this is done by a free program called poedit. It can scan the program and create the .po file that contains all the texts that appear in it, allows translators to translate the texts and also creates the .mo files (automatically).

Creating the .po file is a breeze with poedit. This is what you need to do (all the explanations here refer to poedit):

New poedit catalog

New poedit catalog

File->New catalog…

You will need to enter some information about your program. Most of it is optional. Do make sure you enter the program’s name and the character encoding as ‘utf-8‘.

Next, click on the Paths tab and enter the path to your program.

Last, click on Catalog->Update from source.

You’re done. The .po file should now contain all the texts in your application.

3) Translating the resource file

Translation Panel in ICanLocalize

Translation Panel in ICanLocalize

If you know translators, just send them the .po file. They’ll translate it using poedit and return the translated file to you. We took a slightly different path for the translation work.

To translate Shrink Pic, we created an account at ICanLocalize. It’s a translation service for small businesses, like us. With that, we managed to do all our translation jobs at one place, without having to deal with the translators or any technical issues (like incorrect character encodings).

Next, we created a Text resource translation project. We indicated that we’re translating from English to Spanish, French, German and Japanese and uploaded our .po file.

When the translation was done, we got an email and downloaded each of the .po files.

4) Oops - we forgot some strings…

When we built the translated Shrink Pic, we noticed that some texts are still in English. We’ve forgotten to change the _t() calls to _() calls in some places (they do look rather similar). No problema! We fixed the code and used poedit once more to recreate the .po files. Then, we uploaded the new version for translation (in the ICanLocalize project). This time, the translators only got the new strings and translated them. The completed translations came back the same day and the fully localized Shrink Pic is now online, available to download.

Child ID Cards Working Again

Tuesday, January 6th, 2009
Click to see 2 minute demo

Click image to see 2 minute demo

There was a serious bug in previous versions of Passport Photo which prevented printing child ID cards. Passport Photo 2.1.1 fixes this problem and child ID card printing is working again.

We’d like to thank all of you who sent us bug reports and helped identify the source of the problem. As all bugs go, once you know about it and understand it’s a real problem, you’re 80% through to fixing it!

What are child ID cards?

Here’s a quick reminder of what child ID cards are in Passport Photo:

  • Include a photo of a child and parents (or other adults).
  • Include spaces for names, contact information and comments.
  • Credit card sized to fit into a wallet or badge holder.

How much does it cost?

You don’t need to register Passport Photo in order to print child ID cards without a watermark. Just download and install Passport Photo and you can use it right away (the program might warn you against a watermark, but you can ignore that warning if you’re printing just child ID cards).

Tell us about it

Are you using Passport Photo to print child ID cards? Tell us a bit about it!

Poll Results: Special Passport Printing Equipment Is Unnecessary

Sunday, December 21st, 2008

Two weeks ago, we asked our clients what printer and paper they’re using for printing passport pictures.

Until now, 17 people responded by leaving comments in the printer and paper survey page. We summarized the results in a table, to make it easier to skim through.

It appears that people are very happy with photo printers by most major brands, including HP, Canon, Epson, Fujifilm, Lexmark and Kodak.

Many of the comments indicate that they get good prints using these printers and different types of glossary and photo paper.

Also interesting to notice is that many of the people use our Passport Photo software  to print passport pictures commercially. They report significant saving by using the software, running on their existing PC along with their photo printer. This combination replaces special purpose Polaroid equipment, which is used just for printing passport photos.

In fact, many stopped using their existing Polaroid printers and switched to regular photo printers to save on daily printing costs.

In light of these results, we’re planning to make Passport Photo the best we can for photo shops who print passport photos commercially. If you’ve got an idea about how to make it even better, let us know about it.

The survey page is going to remain open to comments and we’ll update the summary table frequently. You’re welcome to check out what others are using and leave your own feedback.

Visit the survey »

Take Shrink Pic With You When Traveling

Tuesday, September 2nd, 2008

Do you like to send home photos when going on vacation?
Shrink Pic 1.6 makes it especially easy!

Shrink Pic 1.6

Shrink Pic now fully supports portable mode. This means, it can run without being installed. Shrink Pic can copy itself to any USB memory, including your digital camera or a memory stick.

Then, you can run it on any PC without installing. After it finishes running, it saves its setting back to the USB memory and leaves no trace behind.

To use this new feature:

  1. Start Shrink Pic.
  2. Connect a Flash drive to the PC (your digital camera is one too).
  3. Click on File->Copy to Flash Drive.

Shrink Pic shortcut

You’re done. Now, when you connect that camera or flash drive to any PC, you’ll find a shortcut for Shrink Pic on it. Double click on the shortcut and Shrink Pic starts, running directly from the flash drive.

Any photos you attach by email or upload (like uploads to your Yahoo! or Google album) will automatically resize. Sending photos will be about 20 times faster than for the full size photos (so you’ll have more time to enjoy your trip and lower Internet Cafe bills).

Shrink Pic is free for any personal or commercial use (provided it’s left intact). Use our download page to get it.

Online passport photo validator

Saturday, March 29th, 2008

Most of the passport photos people take at home are just fine, and they don’t have to be perfect in order to be accepted.

The most common problems we see, with photos that people send us to review have to do with lighting conditions, shadows and reflections. So, we created an online passport photo validator which lets you see how you photo compares with good and bad samples.

It’s completely free and doesn’t require anything, besides the photo you want to check. Give it a try and let us know what you think.

This utility will also be integrated in the upcoming release of Passport Photo (version 1.6.0).