| 1. | In the albums panel, click an album that you want to burn to a backup disk. |
| 2. | Click the Print CD button in the main window. |
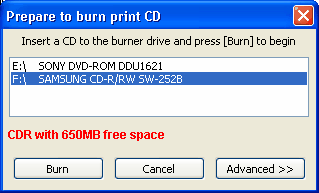
| 3. | On the Prepare to Burn Print CD dialog box, select the drive you want in the Drive list. The dialog box displays the status of the drive in red and the number of necessary backup disks to back up the entire archive. |

| 4. | Click the Burn button. Message boxes display the status of the burn process. The main window closes during the process, which can take several minutes for large albums. |
 Tip Tip
| • | To display the message box on the desktop, press Ctrl + Tab on the keyboard. |
When the photos are burned and the verification process is complete, Photo Backup displays a message box.
 Tips Tips
| • | If the album is too large to fit on one backup disk, Photo Backup prompts you to insert another CD or DVD during the burn process. |
| • | The burn or verification process can fail occasionally. |
When burning or verification fails
 Related Topics Related Topics
Working with albums
Create an album
Print CD button (Main toolbar)
Prepare to Burn Print CD dialog box
|

![]() Tip
Tip![]() Tips
Tips![]() Related Topics
Related Topics