After you create an archive, you can store your photos on backup disks.
| 1. | Click the Make Backup button. A series of message boxes appears, preparing for the burn process. |
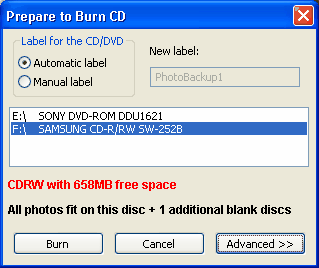
| 2. | On the Prepare to Burn CD dialog box, select the drive you want in the Drive list. The dialog box displays the status of the drive in red and the number of necessary backup disks to back up the entire archive. |

| 3. | Click the Burn button. Several message boxes appear. The main window closes during the process, which can take several minutes for large archives. |
![]() Tips
Tips
| • | Verification is an important part of the burning process. Do not interrupt this process unless you intend to burn the archive to a backup disk again. |
| • | To display the message box on the desktop, press Ctrl + Tab on the keyboard and select the Photo Backup icon. |
After the photos are burned to the backup disks and verification is complete, Photo Backup displays a message box. The photos appear in the main window with white labels.

![]() Tips
Tips
| • | If the archive size is too large to burn on one CD or DVD, Photo Backup prompts you to insert another backup disk during the burn process. |
| • | The burn or verification process can fail occasionally. |
When burning or verification fails
| • | If you want to name the backup disk, click Manual Label on the Prepare to Burn CD dialog box and enter the text you want in the New Label box. This name appears on the drive label in Windows Explorer. |
![]() Related Topics
Related Topics