Professional Digital Photo Backup Program for Windows
|
Product info Typical uses Useful information
|

| Products > Photo Backup > Enabling DMA Mode | |||||||||||||||||||||||||||||||||||||||||||||||||||
How do I enable DMA mode on CD and DVD burner drives?About this technical noteThis document describes how to enable DMA operation for CD or DVD burner drives, regardless of the burning software you use. It includes screenshots of Windows XP. Windows 2000 setup is very similar with the same screens. For Windows 98 and Windows Me slightly different windows are involved. What is DMA mode?DMA (Direct memory access) mode is a high performance mode for transferring data to and from devices, in particular, to CD and DVD burner devices. The burner devices can function in either DMA or PIO modes. DMA mode allows the processor to transfer large pieces of data with very little software overhead - therefore requiring low CPU utilization. In this mode, high speed burning can be performed in background with other programs running. PIO mode requires CPU processing for every few bytes sent to the device, so that CPU utilization becomes very high when trying to burn at high speeds. Which transfer modes are supported by Photo Backup?
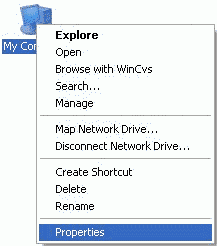
Setting up the burner drive to operate with DMA modeIn order to verify that your drive works in DMA mode, or to change it to DMA mode, follow these steps. Open the hardware setting dialog of Windows. To do this, right-click on 'My computer' and select Properties.
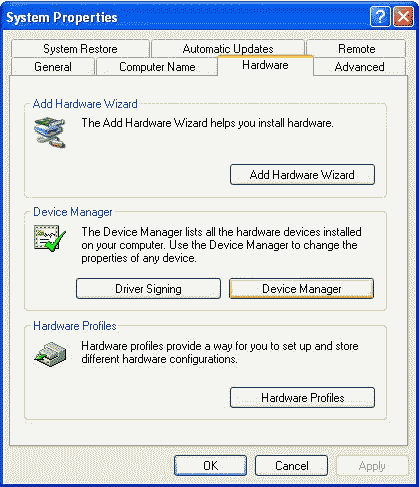
Then, choose the 'Hardware' tab and click on 'Device Manager'.
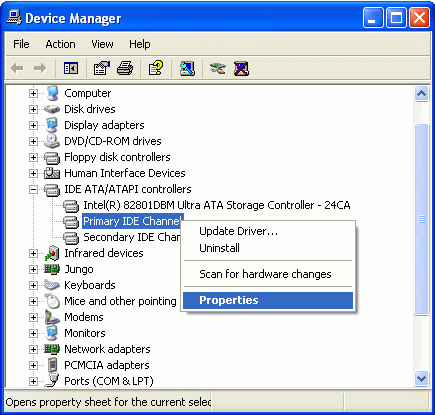
Each burner drive is controlled by an IDE ATA/ATAPI controller. There are probably two controllers in your computer, each with two devices. The drive letter of each burner determines the controller and device responsible for it. The table below can be used to determine the correct controller for your burner drive.
Look for the 'IDE ATA/ATAPI' controllers icon and expand it by clicking on the (+) sign next to it. Select either the Primary or secondary IDE channel, which controls your burner drive, right click on it and select Properties.
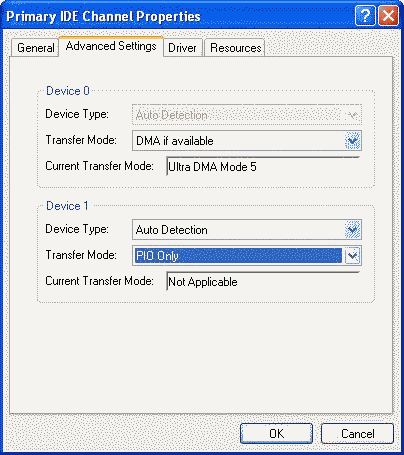
Go to the 'Advanced settings' tab, and the device that you want to set (Device 0 or Device 1). The example below shows that drive D:\ works in PIO only mode. You should modify this to 'DMA if available' mode, to let Windows select DMA mode if it is supported by your burner (it usually is).
Then, click OK. Windows will ask you if you want to reboot, for these settings to take effect. You should allow it. After booting up, the burner drive should work much faster and consume much less CPU power. What if this doesn't work?
Windows XP only
All platforms Protect your digital photos with a professional backup program
|
|||||||||||||||||||||||||||||||||||||||||||||||||||