|
|
|
November 8th, 2007
We’re proud to release a new service by OnTheGoSystems. It’s a translation service that allows translation of complete websites without any knowledge in HTML.
Webmasters can get their sites translated for a fraction of the cost of going through a translation agency.
Translators can get great projects and earn more.
How do we do it? We give both webmasters and translators the tools for managing complete website translations, extracting texts, translating and rebuilding the new website.
There are no sign-up or registration fees. We take a small commission per project (after the project is completed) and that’s it.
The service is now open for registration of all translators. If you’re a professional translator, with proven experience, go and sign up for a translator account.
To get you started quickly, you’ll be able to download our translation software for free and get a small practice project.
We’re looking for translators to and from all languages. The most popular are:
- English
- German
- Spanish
- French
To learn more, visit:
http://translators.icanlocalize.com
Posted in Uncategorized | 6 Comments »
September 18th, 2007
We know, it took us a while, but it’s finally here.
The new update to Shrink Pic (version 1.4.1) runs fine under Windows Vista (and thanks to the folks at Microsoft who made it such an interesting experience for us).
You can grab it from our download page.
* Please note: To properly run, Shrink Pic must start with administrative capabilities. Depending on your security settings, it might ask you for permission just once, or every time you rebooot.
Posted in Shrink Pic | 2 Comments »
August 4th, 2007
Question: I’ve been using Photo Backup for a while and now my computer crashed. What do I do to restore things and keep doing my backup?
Answer:
I recommend that you download the recent version of Photo Backup from our download page. If you need to, you can have your purchase receipt automatically resent to your email address using the support page.
Start up Photo Backup. Use the startup wizard to create a new archive and tell it where your photos are. If your photos were deleted, don’t worry, you’ll get them from the backup DVDs.
You can save some time by manually selecting the folder where you’ve placed all your photos to avoid Photo Backup scanning your system to find that out.
After you’ve set up your archive from scratch, Photo Backup should report the number of photos you have and tell that they all need backup. Now, click on the ‘Archive Setting’ button on the toolbar and select the ‘manage archive’ tab. Insert your backup DVDs and select ‘Scan existing backup’ (once per DVD). Photo Backup should go through your backup and learn which files are already on archive. This process will take a while, as Photo Backup reads the photos from the DVDs and compares them to the photos on your hard drive.
At the end (after you’ve scanned both DVDs), Photo Backup will know which photos are already archived. It reports that on the top left of Photo Backup’s window (Archive Info).
We strongly recommend that you maintain an index CD. To do this, click on ‘Create index’. You can save the index to a CD or a DVD. This will help you avoid the rescan in the future as the archive information is also backed up on the index.
For any help, contact us.
Posted in Photo Backup | Comments Off on My computer crashed, how do I restore the archive from Photo Backup?
April 2nd, 2007
We’ve get frequent questions about what kind of printers, paper and ink people should use to produce acceptable passport photos. I hope that this post might help…
Q: The passport office requires that my prints last for years and sustain high temperatures. Will prints I make at home meet these requirements?
Answer:
The quality of your prints depend more the ink and paper you use and less on the type of printer.
If you need to print your photos for your self, and not on a commercial basis, I recommend that you use Passport Photo to create JPEG files and have them printed in a shop, on regular photo paper. These prints will have very high quality and will surely be accepted.
For commercial printing, you should see what kind of paper you can purchase. Quality paper will come with specifications for the durability of the prints. Then, see what kind of ink you need to use with this paper, and select a printer that can handle this kind of ink.
Posted in Passport Photo | Comments Off on How can I make prints that will last for years?
October 18th, 2006
If you’re working with several different settings for Passport Photo, you can easily create desktop shortcuts that will cause Passport Photo to automatically open with the settings you want.
To do this, you’ll need to create a shortcut (which usually is placed on the desktop, or in a folder inside the desktop) with the following properties:
Target:
“C:Program FilesPassportPhotopassport_photo.exe” “settings_file.ini”
Start in:
“C:Program FilesPassportPhoto”
If you’ve installed Passport Photo in a different folder than “C:Program FilesPassportPhoto”, you’ll need to change it in the paths above.
How do I create this shortcut?
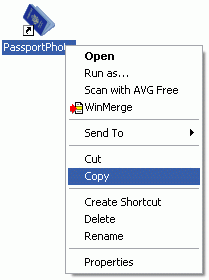
You can start from scratch, or copy the existing Passport Photo icon, and just modify it. Because it’s much easier to copy and add what you need, we’ll start with this.
| 1) Right click on the Passport Photo icon, and select Copy. |
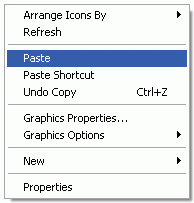
2) Right click on the desktop and Paste a copy of the program icon. |
 |
 |
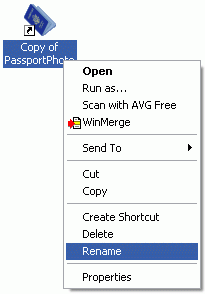
| 3) Rename the new desktop icon – give it a meaningful name. |
 |
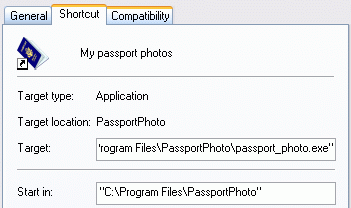
4) Right click on the new icon, select Properties and add the settings file to the Target field.
It’s a good idea to place the name of the .ini file in quotes. To find the full path of the .ini file, open Microsoft Explorer, go to the My DocumetsPassport Photo settings and select the folder name.
Then, copy the location from the address ie “C:Documents and SettingsYOURUSERMy DocumentsPassportPhoto settingsYOURCONFIG.ini” where YOURUSER is your user name and YOURCONFIG.ini is the ini file and paste it to the shortcut’s target so that it reads:
“C:Program FilesPassportPhotopassport_photo.exe” “C:Documents and SettingsYOURUSERMy DocumentsPassportPhoto settingsYOURCONFIG.ini” |
 |
That’s it. Now you can just double click on the new icon and Passport Photo automatically opens the settings you’ve selected.
Posted in Passport Photo | Comments Off on How to get Passport Photo to start with your settings
October 12th, 2006
Photo Backup 2.4.0 is the first release supporting MySQL database as archive storage.
Download it from here.
We’re still in Beta for this release, but you can already download and see if you like it.
To use it, you’ll need to have a MySQL server running, with a database setup.
If you’ve already got a server, just add the database (skip ahead), otherwise, follow these steps:
Setting up a MySQL server
Get the installer from mysql.org.
Run it and follow the instructions for local install. In the default storage type select MyISAM. It’s very important, as this is a fast database. We don’t need the functions that other database types offer, in exchange for speed.
Creating a database
Now, create a database for Photo Backup. It’s highly recommended that you use a dedicated database for Photo Backup, and not use an existing one. You should make sure that the database’s default table format is MyISAM.
What to do in Photo Backup
- Make sure Photo Backup isn’t running.
- Download Photo Backup and install it.
- Launch Photo Backup.
- Click on File and select Enable multiple archives (this would make Photo Backup as you for the archive name)
Click on File->Use MySQL for archives (make sure it’s selected).
- Click on File->Setup MySQL server. It will ask you the server’s location, database name, user name to access the database and password. If you’ve installed MySQL on the same computer as Photo Backup, just enter localhost. Otherwise, you’ll need to enter the network address of that computer.
- If all goes well, no error message should appear. Photo Backup will complain if it cannot access the database.
Then, save your archive to the database.
- Click on File->Save archive as… and enter a name for this database.
That’s all. From now, your archive is stored in your MySQL database and will be loaded from there whenever you start Photo Backup. You don’t need to restart the program, just keep using it.
Different functionality with a MySQL server
So, what did we get by moving to an SQL server?
Good question!
- The most important feature is that data is always up-to-date. There’s no need to save the archive settings when you exit Photo Backup. Every operation you do is immediately stored in the server. That also means it permanent!
- You get true incremental backup. If your archive already includes a large number of photos, it doesn’t need to be read when Photo Backup starts. Photo Backup can read only the parts in the database that are relevant to what you’re doing. When you make new backup, this information is added to the database. The entire database isn’t affected by every file that gets added.
- In case of crash, only the very last thing you do might get lost. Any operation that completed is already stored in the database. If you burn multiple discs, the database updates after every one.
We truly hope you enjoy this new feature. If you have any ideas, or need any help, let us know.
Posted in Photo Backup | Comments Off on Photo Backup 2.4.0, with MySQL support
June 14th, 2006
Shrink Pic – our free photo resize program – can make a real difference in your Internet Cafe.
Every day, you have travelers, backpackers and business men from all over the world downloading their photos and sending them home. After all, who doesn’t like to share his photos with friends and family – as soon as they can?
Well, that’s very nice, but the upload bandwidth you’ve got just isn’t right for this usage. Too many people uploading Megabytes of digital photos, from Hotmail, Gmail and Yahoo! accounts, just isn’t making the surfing any faster for anyone else.
Shrink Pic – our digital photo resize program can make a real difference. Just install it, and you’re done. Your visitors don’t need to do anything special when they send their photos. They can still attach them to emails and send normally, without doing anything different. Shrink Pic detects when they send those photos and resizes them in the background. Now, instead of sending huge files, each photo takes about 100Kbyte – that’s like any other text email that they send.
Shrink Pic is completely free. It doesn’t cost anything, and doesn’t contain any advertisements or third party ‘add ons’. It’s really free. You can download it from Shrink Pic’s download page.
Posted in Shrink Pic | Comments Off on A handy addition for your Internet Cafe software
March 16th, 2006
Photo Backup 2.3.4, released on March 16th 2006, fully supports Adobe DNG and PSD files – making it an ideal choice for professional photographers and digital artists.
Digital Negative is a relatively new photo format from Adobe. The idea is simple and effective – combine the quality of RAW photos, with the information needed to process photos and produce true colors.
Until recently, professional photographers had to make a compromise. They could either use compressed photos with correct colors and white balance, but with compression loses; or they could store images in RAW sensor formats, but without the color balance information. Using Adobe’s DNG format, photographers can now save accurate photos, along with the sensor’s color balance information.
Photo Backup now archives DNG files and produces highly accurate thumbnails for those photos. So now, you can create a searchable index for all your DNG files, and keep track of your DNG archive.
In this release, Photo Backup’s PSD reader was upgraded to support all color mapping options of recent Photo Shop versions. So now, if you use Photo Shop to process and enhance your digital photos, you can also count on Photo Backup to maintain your work in the archive.
To download the recent version of Photo Backup, including these features, please visit:
Photo Backup’s download page
Posted in Photo Backup | Comments Off on Photo Backup 2.3.4 support Adobe DNG and PSD formats
|
|